- Scheduled Maintenance Notice: This site will be unavailable due to scheduled maintenance from 3:00 21/4/2024 to 0:00 (CET) 22/4/2024. We apologize for the inconvenience.
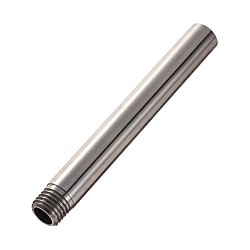
Linear shafts / hollow / external thread on one side, internal thread
Part Number
Once your search is narrowed to one product,
the corresponding part number is displayed here.

| Type | Material | Hardness | Surface Treatment |
| SPJD | EN 1.3505 Equiv. | Effective Hardened Depth of Induction Hardening >>P.112 58HRC~ | - |
| PSPJD | Hard Chrome Plating Plating Hardness: HV750 ~ Plating Thickness: 5µ or More | ||
| RSPJD | LTBC Plating |
Specifications
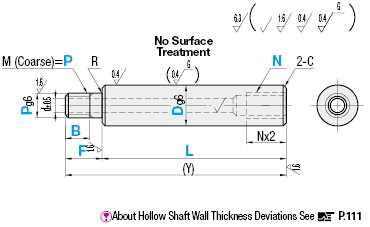
| Part Number | - | L | - | F | - | B | - | P | - | N |
| SPJD20 | - | 277 | - | F12 | - | B12 | - | P20 | - | N16 |
| Part Number | 1mm Increment | P Selection | N (Coarse) Selection | d | (Y)Max. | R | C | ||||
| Type | Dg6 | L | F | B | |||||||
| SPJD PSPJD RSPJD (D≤30,L≤500) | 6 | -0.004 -0.012 | 25~598 | 2≤F≤Px5 | B≤F-2 (When P≤6) B≤F-3 (When P=8, 10) B≤F-5 (When P≥12) B=0 (W/o Threads) B≥Pitchx3 | 6 | 3 | 2 | 600 | - | 0.5 or Less |
| 8 | -0.005 -0.014 | 25~798 | 8 | 4 5 | 3 | 800 | 0.3 or Less | ||||
| 10 | 25~798 | 8 10 | 5 6 | 4 | |||||||
| 12 | -0.006 -0.017 | 25~998 | 10 12 | 8 T1 (RC1/8) | 6 | 1000 | |||||
| 13 | 25~998 | 12 | 10 T1 (RC1/8) | 7 | |||||||
| 16 | 25~1198 | 16 | 12 T2 (RC1/4) | 10 | 1200 | ||||||
| 20 | -0.007 -0.020 | 25~1198 | 20 | 16 T3 (RC3/8) | 14 | 1.0 or Less | |||||
| 25 | 25~1198 | 24 | 20 | 16 | |||||||
| 30 | 25~1498 | 24 30 | 20 | 17 | 1500 | ||||||
| 35 | -0.009 -0.025 | 25~1498 | 30 | 24 | 19 | 0.5 or Less | |||||
| 40 | 25~1498 | 30 | 24 30 | 20 | |||||||
Thread machining will not be applied when B=0 is specified. Overall length L requires Nx3≤L.
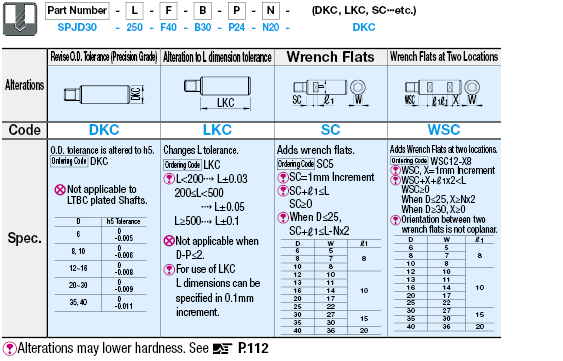
Alterations

Part Number:
- In order to open the 3D preview, the part number must be fixed.
3D preview is not available, because the part number has not yet been determined.
Part Number
|
|---|
| RSPJD6-[25-500/1]-F[0-30/1]-B[2-30/1]-P6-N3 |
| RSPJD8-[25-500/1]-F[0-40/1]-B[2-40/1]-P8-N[4,5] |
| RSPJD10-[25-500/1]-F[0-50/1]-B[2-50/1]-P[8,10]-N[5,6] |
| RSPJD12-[25-500/1]-F[0-60/1]-B[2-55/1]-P[10,12]-N8 |
| RSPJD12-[25-500/1]-F[0-60/1]-B[2-55/1]-P[10,12]-NT1 |
| RSPJD13-[25-500/1]-F[0-60/1]-B[2-55/1]-P12-N10 |
| RSPJD13-[25-500/1]-F[0-60/1]-B[2-55/1]-P12-NT1 |
| RSPJD16-[25-500/1]-F[0-80/1]-B[2-75/1]-P16-N12 |
| RSPJD16-[25-500/1]-F[0-80/1]-B[2-75/1]-P16-NT2 |
| RSPJD20-[25-500/1]-F[0-100/1]-B[2-95/1]-P20-N16 |
| RSPJD20-[25-500/1]-F[0-100/1]-B[2-95/1]-P20-NT3 |
| RSPJD25-[25-500/1]-F[0-120/1]-B[2-115/1]-P24-N20 |
| RSPJD30-[25-500/1]-F[0-150/1]-B[2-145/1]-P[24,30]-N20 |
| Part Number |
Standard Unit Price
| Minimum order quantity | Volume Discount | RoHS | Shaft Dia. D (mm) | Length L (mm) | Surface Treatment | B (mm) | Change Tapped Thread N to Tapered One [NT] 1(RC1/8) 2(RC1/4) 3(RC3/8) | F (mm) | Tapped (Coarse) [N] (mm) | Threaded (Coarse) [P] (mm) | |
|---|---|---|---|---|---|---|---|---|---|---|---|---|---|
- | 1 | 12 Days | 10 | 6 | 25 ~ 500 | LTBC Plating | 0 ~ 30 | - | 0 ~ 30 | 3 | 6 | ||
- | 1 | 12 Days | 10 | 8 | 25 ~ 500 | LTBC Plating | 0 ~ 40 | - | 0 ~ 40 | 4 ~ 5 | 8 | ||
- | 1 | 12 Days | 10 | 10 | 25 ~ 500 | LTBC Plating | 0 ~ 50 | - | 0 ~ 50 | 5 ~ 6 | 8 ~ 10 | ||
- | 1 | 12 Days | 10 | 12 | 25 ~ 500 | LTBC Plating | 0 ~ 55 | - | 0 ~ 60 | 8 | 10 ~ 12 | ||
- | 1 | 12 Days | 10 | 12 | 25 ~ 500 | LTBC Plating | 0 ~ 55 | 1 | 0 ~ 60 | - | 10 ~ 12 | ||
- | 1 | 12 Days | 10 | 13 | 25 ~ 500 | LTBC Plating | 0 ~ 55 | - | 0 ~ 60 | 10 | 12 | ||
- | 1 | 12 Days | 10 | 13 | 25 ~ 500 | LTBC Plating | 0 ~ 55 | 1 | 0 ~ 60 | - | 12 | ||
- | 1 | 12 Days | 10 | 16 | 25 ~ 500 | LTBC Plating | 0 ~ 75 | - | 0 ~ 80 | 12 | 16 | ||
- | 1 | 12 Days | 10 | 16 | 25 ~ 500 | LTBC Plating | 0 ~ 75 | 2 | 0 ~ 80 | - | 16 | ||
- | 1 | 12 Days | 10 | 20 | 25 ~ 500 | LTBC Plating | 0 ~ 95 | - | 0 ~ 100 | 16 | 20 | ||
- | 1 | 12 Days | 10 | 20 | 25 ~ 500 | LTBC Plating | 0 ~ 95 | 3 | 0 ~ 100 | - | 20 | ||
- | 1 | 12 Days | 10 | 25 | 25 ~ 500 | LTBC Plating | 0 ~ 115 | - | 0 ~ 120 | 20 | 24 | ||
- | 1 | 12 Days | 10 | 30 | 25 ~ 500 | LTBC Plating | 0 ~ 145 | - | 0 ~ 150 | 20 | 24 ~ 30 |
Loading...
More Information
Circular L standard tolerance, Circularity, Straightness, Perpendicularity, Concentricity and Changes in Hardness >>P.111
LTBC Plating is not applied to the inside of hollow shafts, taps, bored holes
and lateral holes, and may rust.
Shaft End Machined Area (Effective Thread Length + Approx. 10mm)
Annealing may lower hardness.
Basic information
| Basic Shape | Hollow | Shaft end shape (left) | Threads | Shaft end shape (right) | Tapped |
|---|---|---|---|---|---|
| Material | EN 1.3505 Equiv. | Heat Treatment | Induction Hardened | Shaft Fits Tolerance | g6 |
| Hardness | Induction Hardening (58HRC~) |
Configure
Basic Attributes
-
Shaft Dia. D(mm)
-
Length L(mm)
-
B(mm)
-
Change Tapped Thread N to Tapered One [NT] 1(RC1/8) 2(RC1/4) 3(RC3/8)
-
F(mm)
-
Tapped (Coarse) [N](mm)
-
Threaded (Coarse) [P](mm)
-
Type
- PSPJD
- RSPJD
- SPJD
-
Surface Treatment
- No
- Hard Chrome Plating
- LTBC Plating
-
Filter by CAD data type
- 2D
- 3D
Filter by standard shipping days
-
- All
- 7 Days or Less
- 12 Days or Less
Optional Attributes
- The specifications and dimensions of some parts may not be fully covered. For exact details, refer to manufacturer catalogs .
Complementary Products
MISUMI Unit еxample related to this product
Tech Support
- Technical Support
- Tel:+49 69 668173-0 / FAX:+49 69 668173-360
- Technical Inquiry


