CARBIDE BUTTON DIES
| Button die type |
Material | Outer diameter tolerance |
Normal | Scrap retention | Non-clogging | ||
|---|---|---|---|---|---|---|---|
| Round | Shaped | Round | Shaped | Round | |||
| Carbide headed | |||||||
 |
V40(HIP) | Dm5 | WHD | WHD□ | SR-WHD | SR-WHD□ | SV-WHD |
D |
A-WHD | A-WHD□ | SRA-WHD | SRA-WHD□ | SVA-WHD | ||
| Carbide straight | |||||||
 |
V40(HIP) | Dn5 | WSD | WSD□ | SR-WSD | SR-WSD□ | SV-WSD |
D |
A-WSD | A-WSD□ | SRA-WSD | SRA-WSD□ | SVA-WSD | ||
| Carbide angular headed | |||||||
 |
V40(HIP) | Dm5 | WAHD | WAHD□ | SR-WAHD | SR-WAHD□ | SV-WAHD |
D |
A-WAHD | A-WAHD□ | SRA-WAHD | SRA-WAHD□ | SVA-WAHD | ||
| Carbide angular straight | |||||||
 |
V40(HIP) | Dn5 | WASD | WASD□ | SR-WASD | SR-WASD□ | SV-WASD |
D |
A-WASD | A-WASD□ | SRA-WASD | SRA-WASD□ | SVA-WASD | ||
Scrap retention button dies(Products data  Click
here)
●Applicable range1.Hole diameter:φ1.0~φ16
2.Workpiece material: Can be used for materials with tensile strengths up to 1177N/mm2(120Kgf/mm2)
3.Thickness of workpiece material: Minimum thickness 0.15mm
4. Scrap retention effects cannot be expected when the clearance(C) is larger than the workpiece material thickness(MT) by more than 20%.Therefore, keep the difference to 20% or less.
Clearance on one side(C)<Workpiece material thickness(MT)×20%
 Because scrap retention button dies prevent scrap lifting by forming small
projections on punching scrap, they are not suitable in cases such as punching of precision holes, or when the punched-out
item becomes the product.
 Non-clogging button dies(Products data Click
here)
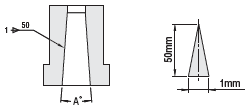
Indication of button die relief angles

 indicates a taper in which the diameter increases by 1 mm over 50 mm of
length.
indicates a taper in which the diameter increases by 1 mm over 50 mm of
length.| Taper | 1/50 | 1/100 | 1/150 |
|---|---|---|---|
| Angle(A°) | 1.146° | 0.573° | 0.382° |


