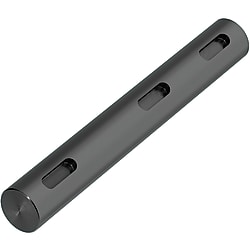
Rotary Axes / Keyway / Optional Machining (Part Numbers - CAD Download)
Part Number
Once your search is narrowed to one product,
the corresponding part number is displayed here.
- Drawing / Specifications
- 3D Preview 3D preview is available after complete configuration
- Part Numbers
- More Information
- Catalog
- Technical Information
Dimensional Drawing

 |
| ||||||||||||||||||||||||||||||||||||||||||||||
| [ ! ] When KA < 1, KA + A = L, KB + B = L and L - KC - C < 1, keyway is shaped as shown below.  | |||||||||||||||||||||||||||||||||||||||||||||||
 . Surface roughness for h7 (Ground) and g6 (Ground) is
  .
.[ ! ] Number of keyways can be specified up to 3.
[ ! ] When multiple keyways are added, keep 2 mm or more clearance between them.
[ ! ] High hardness stainless steel may have a center hole.
 ■Circularity and Straightness | [ ! ] Circularity and straightness of Part D are not applicable to h9 (Cold-drawn). |
| D | Circularity M | |
| over | or Less | |
| 5 | 13 | 0.004 |
| 13 | 20 | 0.005 |
| 20 | 40 | 0.006 |
| 40 | 50 | 0.007 |
| Dimension | Dimension Tolerance | |
| over | or Less | |
| 2 | 6 | ±0.1 |
| 6 | 30 | ±0.2 |
| 30 | 120 | ±0.3 |
| 120 | 400 | ±0.5 |
| 400 | 1000 | ±0.8 |
| Type | D Tolerance | [M] Material | [S] Surface Treatment | |
| (1) | NSFMKR | h9 (Cold-drawn) | EN 1.1191 Equiv. | — |
| SFMKR | Black Oxide | |||
| PSFMKR | Electroless Nickel Plating | |||
| SSFMKR | EN 1.4301 Equiv. | — | ||
| (2) | NSFHKR | h7 (Ground) | EN 1.1191 Equiv. | — |
| SFHKR | Black Oxide | |||
| PSFHKR | Electroless Nickel Plating | |||
| SSFHKR | EN 1.4301 Equiv. | — | ||
| (3) | NSFGKR | g6 (Ground) | EN 1.1191 Equiv. | — |
| SFGKR | Black Oxide | |||
| PSFGKR | Electroless Nickel Plating | |||
| SSFGKR | EN 1.4301 Equiv. | — | ||
| AHFGKR | High Hardness Stainless Steel Hardness: 35HRC or More | — | ||
Specification Table
| Part Number | — | L | Keyway (1) | Keyway (2) | Keyway (3) | ||||||||||
| — | — | — | |||||||||||||
| KA | — | A | KB | — | B | KC | — | C | |||||||
| 1 Keyway 2 Keyways 3 Keyways | SFMKR10 SFHKR30 SFGKR25 | — — — | 325 330 350 | — — — | KA20 KA20 KA10 | — — — | A50 A50 A10 | — — | KB120 KB90 | — — | B20 B30 | — | KC210 | — | C30 |
| Part Number | L 0.1 mm Increments | Keyway (1) | Keyway (2) | Keyway (3) | ||
| Type | Dh9 | KA·A | KB·B | KC·C | ||
| Tolerance | 0.1 mm Increments | |||||
| NSFMKR SFMKR PSFMKR SSFMKR (D13, 17, 18 or 22 is not available for SSFMKR.) | 6 | 0 −0.030 | 15.0 to 500.0 | KA+A ≤ L KA ≥ 0 b ≤ A ≤ 100 | KB+B ≤ L KB ≥ 0 b ≤ B ≤ 100 | KC+C ≤ L KC ≥ 0 b ≤ C ≤ 100 |
| 8 | 0 −0.036 | 15.0 to 500.0 | ||||
| 10 | 15.0 to 800.0 | |||||
| 12 | 0 −0.043 | 15.0 to 900.0 | ||||
| 13 | 15.0 to 900.0 | |||||
| 15 | 15.0 to 1000.0 | |||||
| 16 | 15.0 to 1000.0 | |||||
| 17 | 20.0 to 1000.0 | |||||
| 18 | 20.0 to 1000.0 | |||||
| 20 | 0 −0.052 | 20.0 to 1000.0 | ||||
| 22 | 20.0 to 1000.0 | |||||
| 25 | 20.0 to 1000.0 | |||||
| 30 | 20.0 to 1000.0 | |||||
| 35 | 0 −0.062 | 70.0 to 1000.0 | ||||
(2) h7 (Ground)
| Part Number | L 0.1 mm Increments | Keyway (1) | Keyway (2) | Keyway (3) | ||
| Type | Dh7 | KA·A | KB·B | KC·C | ||
| Tolerance | 0.1 mm Increments | |||||
| NSFHKR SFHKR PSFHKR SSFHKR | 6 | 0 −0.012 | 15.0 to 500.0 | KA+A ≤ L KA ≥ 0 b ≤ A ≤ 100 | KB+B ≤ L KB ≥ 0 b ≤ B ≤ 100 | KC+C ≤ L KC ≥ 0 b ≤ C ≤ 100 |
| 8 | 0 −0.015 | 15.0 to 500.0 | ||||
| 10 | 15.0 to 800.0 | |||||
| 12 | 0 −0.018 | 15.0 to 900.0 | ||||
| 15 | 15.0 to 1000.0 | |||||
| 17 | 20.0 to 1000.0 | |||||
| 20 | 0 −0.021 | 20.0 to 1000.0 | ||||
| 25 | 20.0 to 1000.0 | |||||
| 30 | 20.0 to 1000.0 | |||||
| 35 | 0 −0.025 | 70.0 to 1000.0 | ||||
| 40 | 80.0 to 1000.0 | |||||
| 50 | 100.0 to 1000.0 | |||||
(3) g6 (Ground)
| Part Number | L 0.1 mm Increments | Keyway (1) | Keyway (2) | Keyway (3) | |||
| Type | Dg6 | KA·A | KB·B | KC·C | |||
| Tolerance | 0.1 mm Increments | ||||||
| NSFGKR SFGKR PSFGKR SSFGKR AHFGKR (Only * marked numbers are available.) | * 6 | −0.004 −0.012 | 15.0 to 500.0 | KA+A ≤ L KA ≥ 0 b ≤ A ≤ 100 | KB+B ≤ L KB ≥ 0 b ≤ B ≤ 100 | KC+C ≤ L KC ≥ 0 b ≤ C ≤ 100 | |
* 8 | −0.005 −0.014 | 15.0 to 500.0 | |||||
* 10 | 15.0 to 800.0 | ||||||
* 12 | −0.006 −0.017 | 15.0 to 900.0 | |||||
13 | 15.0 to 900.0 | ||||||
* 15 | 15.0 to 1000.0 | ||||||
* 16 | 15.0 to 1000.0 | ||||||
17 | 20.0 to 1000.0 | ||||||
18 | 20.0 to 1000.0 | ||||||
* 20 | −0.007 −0.020 | 20.0 to 1000.0 | |||||
22 | 20.0 to 1000.0 | ||||||
* 25 | 20.0 to 1000.0 | ||||||
30 | 20.0 to 1000.0 | ||||||
35 | −0.009 −0.025 | 70.0 to 1000.0 | |||||
40 | 80.0 to 1000.0 | ||||||
50 | 100.0 to 1000.0 | ||||||
Alterations
| Alterations Code | Alteration Details | Applicable Conditions | Ordering Example | ||||||||||||||||||||||
| FC | Set Screw Flat at One Location | FC, G = 1 mm Increments [ ! ]G ≤ 70 | SFHKR30-300-KA100-A20-FC10-G3 | ||||||||||||||||||||||
| WFC | Set Screw Flats at Two Locations | WFC, J, W, V = 1 mm Increments [ ! ]J·V ≤ 70 | SFHKR30-300-KA100-A20-WFC10- J15-W10-V20 | ||||||||||||||||||||||
| SFC | Set Screw Flat, 2 Set Screw Flats (Angle Specified) | SFC, SG = 1 mm Increments AG = 15° Increments [ ! ]SG ≤ 70 | SFHKR30-300-KA100-A20-SFC10- SG3-AG90 | ||||||||||||||||||||||
| KWC | Set Screw Flat, 2 Set Screw Flats on Both Ends | KWC = 1 mm Increments [ NG ] Not applicable when Shaft Dia. ≤ ø6, when D = 13, 16, 17, 18 or 22 [ NG ] Not applicable when L > 680 | SFHKR30-300-KA100-A20-FC10- KWC20 | ||||||||||||||||||||||
| WC | Set Screw Flat, Chamfering Depth Configurable | WC = 0.1 mm Increments [ NG ] Not applicable when Shaft Dia. ≤ ø6, when D = 13, 16, 17, 18 or 22 [ NG ] Not applicable when L > 680 [ ! ] Only when KWC is specified, WC is available
| SFHKR30-300-KA100-A20-FC10- KWC20-WC22.0 | ||||||||||||||||||||||
| TA·TB | Retaining Ring Groove | TA, TB = 0.1 mm Increments [ ! ]2 ≤ TA·TB ≤ 150 | SFHKR30-300-KA100-A20-TA10- TB10 | ||||||||||||||||||||||
| UC | Slit Cam Groove | UC = 1 mm Increments [ NG ] Not applicable when Shaft Dia. = ø2 or ø2.5 or when D ≥ 13 [NG] AHFGKR is not available | SFHKR10-300-KA100-A20-UC10 | ||||||||||||||||||||||
| LKC | L Dimension Tolerance Change | L < 500···L±0.05 L ≥ 500···L±0.1 [ NG ] Not applicable when L ≥ 800 | SFHKR30-300-KA100-A20-LKC | ||||||||||||||||||||||
| SC | Wrench Flats | SC = 1 mm Increments [ NG ] Not applicable when D ≤ 5 | SFHKR30-300-KA100-A20-SC10 | ||||||||||||||||||||||
| CD | Changes Part D Chamfering | Changes Part D Chamfering Size * Select CD from table [ ! ] Only values provided on the Applicable Dia. Table are applicable
| SFHKR30-300-KA100-A20-CD5 |
[ ! ] When multiple keyways or set screw flats are specified, they are added in the same plane. When the distance of the alterations are over 500 mm, ± 2 degree phase difference may occur.
Detailed Retaining Ring Groove Dimensions for Rotary Shafts
|
| 
| |||||||||||||||||||||||||||||||||||||||||||||||||||||||||||||||||||||||||||||||||||||||||||||||||||||||||||||||||||||||||||||||||||||||
[ ! ] An applicable retaining ring is included in the retaining ring groove.
| D | Center Hardness (HRC) |
| 3 | 35 or More |
| 4 | 35 or More |
| 5 | 35 or More |
| 6 | 35 or More |
| 8 | 35 or More |
| 10 | 30 or More |
| 12 | 30 or More |
| 15 | 30 or More |
| 16 | 30 or More |
| 20 | 25 or More |
| 25 | 25 or More |
| Material | Tensile Strength (Mpa) | Yielding Point (0.2% Proof Stress) (MPa) | Young's Modulus (GPa) | Transverse Modulus (GPa) | Poisson Ratio |
| EN 1.1191 Equiv. | 570 or More | 345 or More | 200 or More | 77 or More | 0.3 |
| EN 1.4301 Equiv. | 520 or More | 210 or More | 193 or More | 74 or More | 0.3 |
| EN 1.7220 Equiv. | 930 or More | 785 or More | 206 or More | 79 or More | 0.3 |
| High Hardness Stainless Steel | 1102 | 715 | 199 | 77 | 0.3 |
High Hardness Stainless Steel Material Properties
(Unit: %)
| C | Si | Mn | P | S | Ni | Cr |
| 0.15-0.25 | ≤ 0.50 | 7.5-9.5 | ≤ 0.05 | ≥ 0.12 | 1.5-3.0 | 13-15 |
Part Number:
- In order to open the 3D preview, the part number must be fixed.
3D preview is not available, because the part number has not yet been determined.
| Part Number |
Standard Unit Price
| Minimum order quantity | Volume Discount | RoHS | Material | Surface Treatment | D Tolerance | Shaft Dia. D (mm) | Length L (mm) | A (mm) | Keyway (1) [KA] (mm) | |
|---|---|---|---|---|---|---|---|---|---|---|---|---|
- | 1 | 6 Days | - | [Steel] EN 1.1191 Equiv. | [Surface Treatment Provided] Black Oxide | h9 (Cold-drawn) | 18 | 20 ~ 1000 | 6 ~ 100 | 0 ~ 1000 | ||
- | 1 | 5 Days | 10 | [Steel] EN 1.1191 Equiv. | [Surface Treatment Provided] Black Oxide | h9 (Cold-drawn) | 20 | 30 ~ 1000 | 6 ~ 150 | 0 ~ 1000 | ||
- | 1 | 6 Days | - | [Steel] EN 1.1191 Equiv. | [Surface Treatment Provided] Black Oxide | h9 (Cold-drawn) | 22 | 20 ~ 1000 | 6 ~ 100 | 0 ~ 1000 | ||
- | 1 | 5 Days | 10 | [Steel] EN 1.1191 Equiv. | [Surface Treatment Provided] Black Oxide | h9 (Cold-drawn) | 25 | 50 ~ 1000 | 8 ~ 150 | 0 ~ 1000 | ||
- | 1 | 5 Days | 10 | [Steel] EN 1.1191 Equiv. | [Surface Treatment Provided] Black Oxide | h9 (Cold-drawn) | 30 | 60 ~ 1000 | 8 ~ 150 | 0 ~ 1000 | ||
- | 1 | 6 Days | 10 | [Steel] EN 1.1191 Equiv. | [Surface Treatment Provided] Black Oxide | h9 (Cold-drawn) | 35 | 70 ~ 1000 | 10 ~ 100 | 0 ~ 1000 |
Loading...
App. Example

Basic information
| Basic Shape | Straight | Environmentally friendly | RoHS Compliant (10 Substances) | End Shape (Left) | Straight |
|---|---|---|---|---|---|
| Characteristics/Applications | Not Applicable | End Shape (Right) | Straight | Hardness | No Hardened |
| Keyway | With Keyway | Cleaning Method | No Cleaning | Wrench Flats | Wrench flats option (alteration) |
Configure
Basic Attributes
-
Material
- Steel
- Stainless Steel
- Steel
-
Surface Treatment
- NA
- Surface Treatment Provided
-
D Tolerance
- h9 (Cold-drawn)
- h7 (Ground)
- g6 (Ground)
-
Shaft Dia. D(mm)
-
Length L(mm)
-
A(mm)
-
Keyway (1) [KA](mm)
-
Type
- AHFGKR
- NSFGKR
- NSFHKR
- NSFMKR
- PSFGKR
- PSFHKR
- PSFMKR
- SFGKR
- SFHKR
- SFMKR
- SSFGKR
- SSFHKR
- SSFMKR
-
Filter by CAD data type
- 2D
- 3D
Filter by standard shipping days
-
- All
- 4 Days or Less
- 5 Days or Less
- 6 Days or Less
- 9 Days or Less
Optional Attributes
- The specifications and dimensions of some parts may not be fully covered. For exact details, refer to manufacturer catalogs .
Complementary Products
Tech Support
- Technical Support
- Tel:+49 69 668173-0 / FAX:+49 69 668173-360
- Technical Inquiry


