ideanote
inCAD Library

Make sure to read this before use

What is inCAD Library?

  • Helpful application examples for mechanical engineers.

The Concept of inCAD Library

  • Online application library with a range of ideas for all manufacturing industries.
  • Save design time and learn new design applications when you are concepting new machines.

Disclaimer

  • MISUMI may not offer all parts in each application design. Available parts can only be purchased separately not as a unit shown in each application design.
  • MISUMI does not guarantee quality, accuracy, functionality, safety or reliability for the combination of the parts in each application example. Accept these points prior to use.
  • 2014 Copyright MISUMI
  • The data cannot be used for any purposes (including sales promotion) except for designing your machine.
  • All associated CAD is free. MISUMI reserves the right at its sole discretion to cancel, terminate or modify this offer.
  • MISUMI may change, add or delete application examples posted without prior notice.
  • MISUMI assumes no responsibilities for any damage incurred resulting from your use of the Service or any change, addition or deletion by MISUMI of the application examples for any reason whatsoever.

Features of inCAD Library

  1. Get great new design ideas for these application examples.
  2. Over 200 design application ideas collected from dozens of industries!

  3. Find application examples quickly! Search by function, workpiece shape, etc.

  4. Download the CAD models for each application example.
  5. Log in to download free CAD models.
    Download CAD for the entire application example!

Good IDEA! Button

Click the Good IDEA! Button when you like an application example!

*Can only be clicked once per application example.

  • Upper right corner on the page of application example details

  • Pop-up dialog for CAD data downloading

Back to top

inCAD Library Keyword Search
inCAD Library No. Search

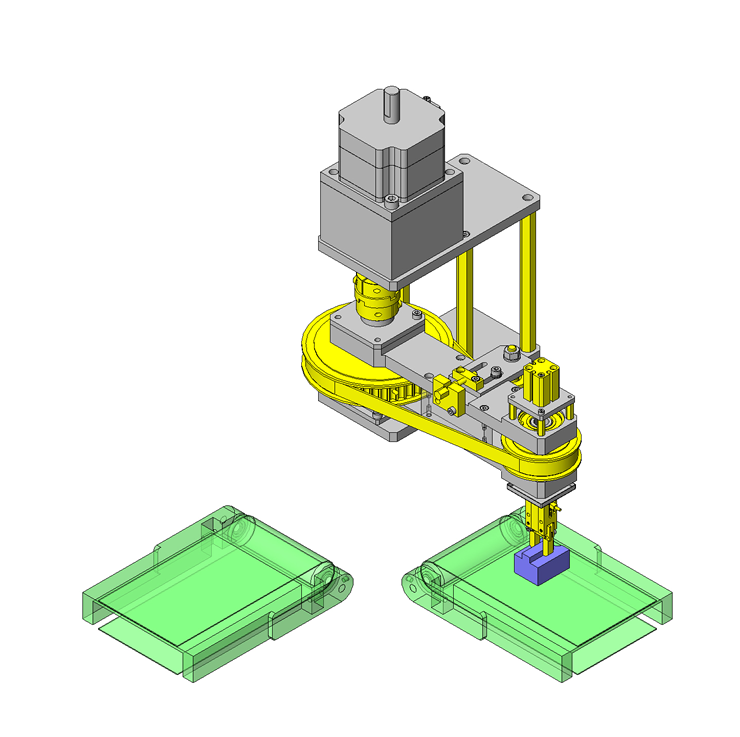
No.000127 Workpiece rotate and transfer mechanism

Rotate and transfer but workpiece orientation in direction of travel remains the same.

Related Category

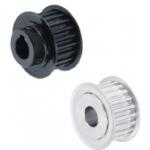
Timing Pulley

Product name High Torque Timing Pulleys/8YU
Part number GPA50YU8150-A-N30
Features Circular Tooth Profile Pulleys with little backlash, suitable for positioning.
* Orange colored cells in the table below indicate the part numbers used in this example.

Selection criteria

Low backlash, light weight pulley.

Back to page top

Available sizes

■High torque timing pulley 8YU type

Material Surface treatment Included
set screw
material
Pulley Flange
EN AW-2017 Equiv. EN AW-5052 Equiv. Clear anodize EN 1.4301 Equiv.
EN 1.1191 Equiv. Low Carbon Steel - Chromium-molybdenum steel
(Black oxide)
Black oxide

■Number of teeth and shaft bore DIA.

Shape Applicable belt width Number of teeth Pitch circle DIA. Shaft bore DIA.
With hub 15 ・ 20 ・ 25 20 - 60 Ø50.93 - Ø152.79 Ø16 - 32
No hub

* Please see the product pages for details.

Back to page top

Selection steps

■Timing pulley selection steps

Determining of usage conditions
Designed power, rotational speed, rotation ratio, interim shaft distance, motion pattern, etc.)

Pulley (Belt) temporary selection
Tooth profile・Belt width

Verification of specifications applicability
  • Confirmation of calculated shaft distance, etc.
  • Confirmation of belt tension and load

Back to page top

Accuracy Info

■Timing pulley accuracy

Shaft bore tolerance: H7

Back to page top

Technical calculations

■Technical calculations

1. https://uk.misumi-ec.com/pdf/fa/p2823.pdf

Back to page top

Ball Spline

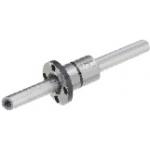
Product name Ball Splines/Both Ends Tapped
Part number BSHS6-80-M3-N3
* Orange colored cells in the table below indicate the part numbers used in this example.

Selection criteria

Used for both linear and rotary motion at the same time

Back to page top

Available sizes

■Ball spline (Both ends tapped)

Spline
shaft
Material EN 1.3505 Equiv. EN 1.4125 Equiv.
Hardness 58HRC ~ 55HRC ~
Nut Material EN 1.722515 Equiv. EN 1.4125 Equiv.
Hardness 58HRC ~ 55HRC ~
Shape Round flange
Compact flange -
Straight

■Dimensions

Spline shaft Nut
Name No. Shaft DIA. Overall length Pilot DIA.
6 Ø6 60 - 400 Ø14
8 Ø8 Ø16
10 Ø10.4 90 - 600 Ø21
13 Ø13.4 100 - 600 Ø24
16 Ø16.6 110 - 600 Ø31

* Length selection range will vary according to material and nut configuration.
Please see the product pages for details.

Back to page top

Selection steps

■Ball spline selection steps

Determine application conditions
(Load, Torque, Feed distance, Life)

Temporarily select ball spline specifications
(Spline shaft DIA., spline shaft length, overall length are temporarily selected based on application conditions.)

Safety Check
  • ●Load capacity
  • ●Life

Back to page top

Accuracy Info

■Ball spline shaft accuracy

(µm)

Name
No.
Spline
shaft DIA.
Nut O.D. runout Spline shaft center runout (Max.)
(Max.) Length - 200 201 - 315 316 - 400 401 - 500 501 -
6 Ø6 27 72 89 126 163 -
8 Ø8
10 Ø10.4 33 59 83 103 82 102
13 Ø13.4 39 56 71 83 62 75
16 Ø16.6

Back to page top

Performance info.

■Ball spline rated loads

Name
No.
Basic torque rating Basic load rating
Dynamic (Nm) Static (Nm) Dynamic (kN) Static (kN)
6 3.8 7 1.2 2.1
8 4.8 8.7 1.2 2.1
10 11 21 2.4 4.3
13 20 37 3.3 5.9
16 51 93 6.2 11.1

Back to page top

Technical calculations

■Ball spline life calculations

Ball spline's running life is calculated with the formula below.

●For radial load

ラジアル負荷の場合

●For torque load

トルク負荷の場合
  • L: Life (km)
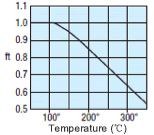
  • ft: Temperature factor
  • fh: Hardness factor
  • fp: Load rating ratio
  • fw: Load factor
  • L0: Rated life (50km)
  • C: Basic dynamic load rating (N)
  • F: Applicable radial load (N)
  • Ct: Basic dynamic torque rating (N・m)
  • T: Applicable torque (N・m)

Ball spline's life time is calculated with the formula below.

寿命時間
  • Lh: Run hours (hr)
  • L: Life (km)
  • St: Stroke length
  • n: Cycles per minute (cpm)

■Temperature factor (ft)

Temp. factor (ft)

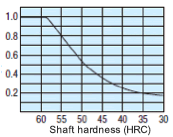
■Hardness factor (fh)

Hardness factor (fh)

■Rated load ratio (fp)

Name No. Spline shaft DIA. Distributed load Direct download
10 Ø10.4 1 0.71
13 Ø13.4 1 0.71
16 Ø16.6 1 0.68

■Load factor (fw)

App. condition Load factor (fw)
No vibrations or shocks
(Low speed 1 ~ 2 15m/min or less)
1 - 2
Some vibrations and shocks
(Med. speed 2 ~ 3 60m/min)
2 - 3
Severe vibrations and shocks
(High speed 3 and over 60m/min or over)
3 -

Back to page top

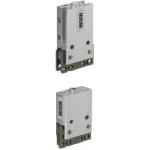
Air Gripper

Product name Air Gripper/Parallel Type
Part number ACHK6-D
Features Compact Type Pneumatic Grippers with high precision, high rigidity, strong retaining force
* Orange colored cells in the table below indicate the part numbers used in this example.

Selection criteria

Suitable for gripping small rectangular workpiece

Back to page top

Available sizes

■Small parallel gripper (Sensor mounted type)

Part name Material Surface treatment
Main body EN AW-5056 Equiv. Clear anodize
Jaws ・ attachment mounting EN 1.1191 Equiv. Nitriding treatment

■Specifications and Dimensions

Operating method Stroke Cylinder I.D. Overall width Overall height Overall thickness
Single acting ・ Double acting 4 Ø8 26 40.5 10
6 Ø12 30 45 16.4

Back to page top

Accuracy Info

■Small parallel gripper selection steps

Confirm Design Specifications
(Confirm required stroke, workpiece weight, etc.)

Calculations of required gripping force
10 ~ 20 times the workpiece weight
(Varies depending on friction coefficient between the jaws and workpiece)

Selecting a model type and applicability confirmation
  • ●Gripping method (O.D. gripping ・ I.D. gripping)
  • ●Open/close operation method (Single acting ・ Double acting)
  • ●Stroke
  • ●Gripping points and gripping force

Back to page top

Performance info.

■Small parallel gripper (Sensor mounted type) load info.

Stroke Cylinder
I.D.
Operating pressure
range
Effective grip force (N) Allowable static load rating (N)
Single acting (Spring) Dual acting F1 F2
4 Ø8 0.3 ~ 0.5MPa 4.2 (1) 4.9 5 2.5
6 Ø12 10.4 (1.9) 12.2 10 5

Back to page top

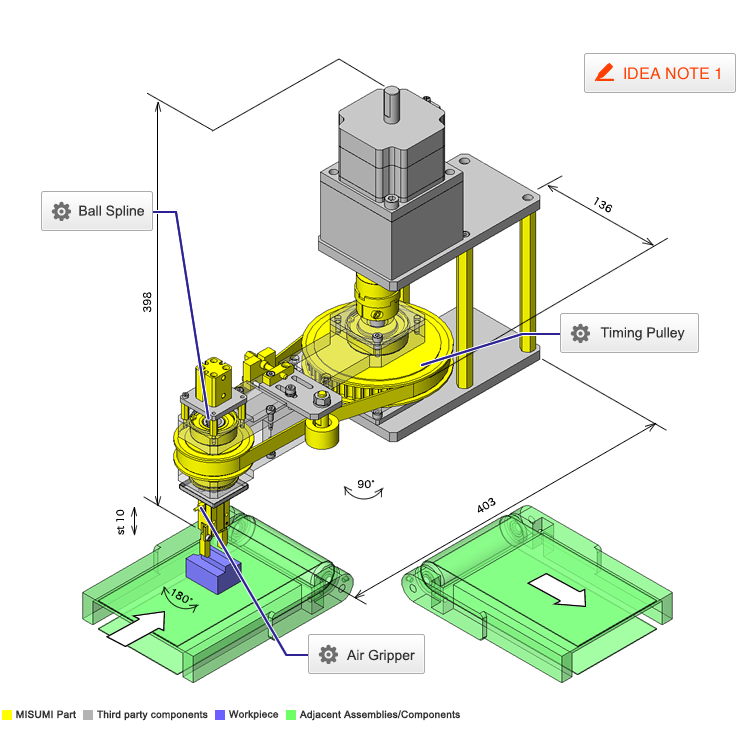
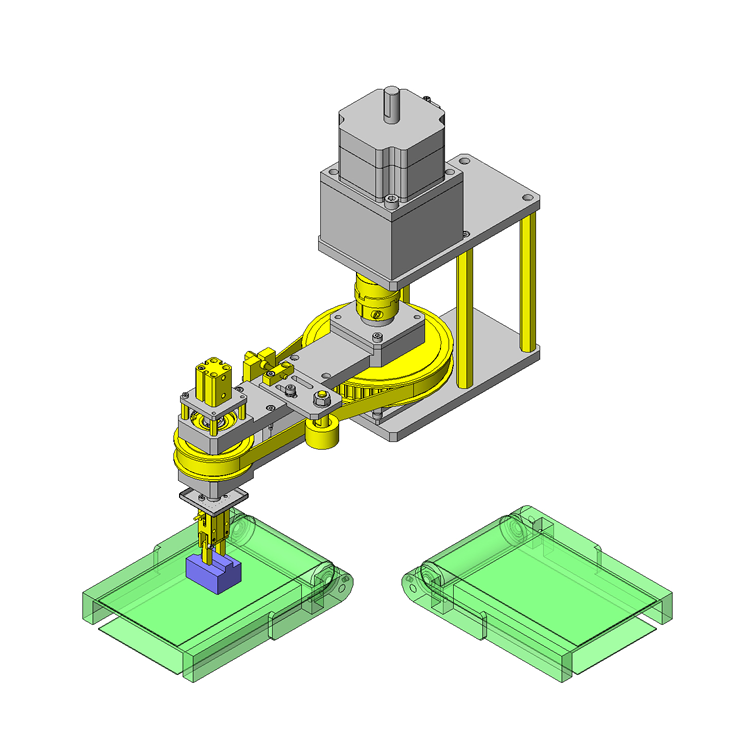
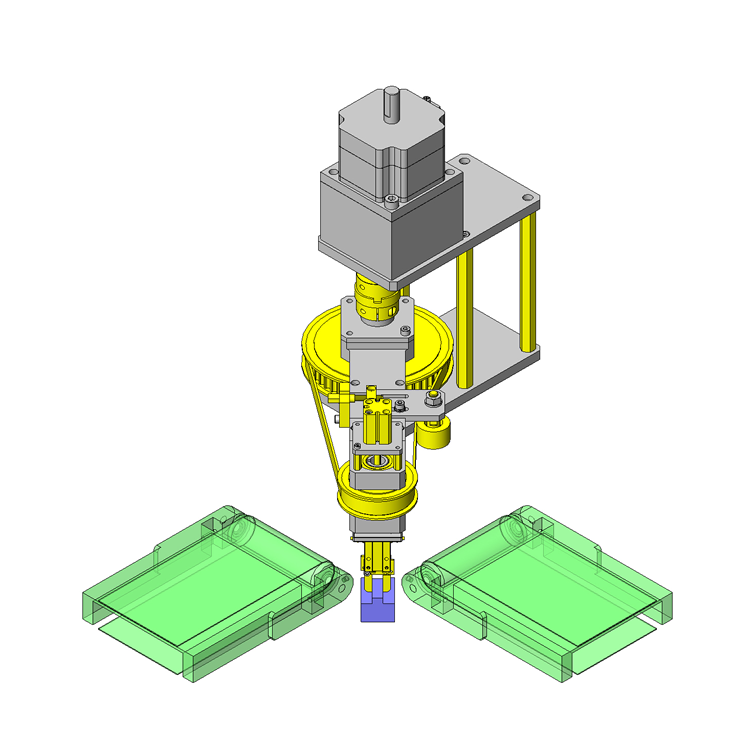
IDEA NOTE One actuator performs swinging and workpiece rotation.

Drive pulley rotates the gripper arm 90°-from one conveyor line to another. Since pulley ration is 2:1, part of the gripper arm rotates 180° (driven pulley translates the motion to ball spline and workpiece gripper).

  • TERMS AND CONDITIONS FOR USE OF CAD DATA
    Your access to the CAD data that MISUMI Corporation (hereinafter referred to as the Company) posts on this site (including 3D CAD data, intermediate 3D CAD data and 2D CAD data; hereinafter referred to as the Data) are of products manufactured and/or sold by the Company (hereinafter referred to as the Products) assumes that you have read and accepted these terms and conditions which govern your use of the Data. If you do not agree to these terms and conditions, you must stop using this website and the Data. You must not use the Data for any unlawful purpose or in any manner inconsistent with these terms and conditions.
    1. CAD Data
    The Data is prepared for assisting the Company's users in the CAD design process by providing dimensions and other Product information. In order to provide the best speed and stability working within this site, the Product drawings were simplified to reduce the size of the Data. For instance, some of the Products are shown without the oil groove shape, screws or spring shape. Also, please be aware that the tolerance, surface roughness and/or chamfer of the Data may vary from the actual Products.
    2. Disclaimer on Data
    While the Company has carefully prepared the Data, accuracy of the Data is not guaranteed and is subject to the variances as described above. The Company may also modify, add or delete the Data at any time without prior notice. The Company assumes no liability for any direct, indirect, consequential or special damages that you may claim resulted from your use of the Data or any changes to or deletions of the Data regardless of the reason. The Company provides no warranty as to the quality, accuracy, functionality, safety or reliability of the combination of Products and parts. Example applications and combinations of the Products are provided for illustrative purposes only.
    3. Copyright
    Copyrights to the content and the Data belong to the Company or the manufacturers of the Products. The said copyright is protected by the Copyright Act and international treaties. The use (including duplication, modification, uploading, posting, transmission, distribution, licensing, sales and publishing) of the Data except for the purpose to use the Data described above without prior approval of the Company is not allowed. The Data cannot be used for any purposes (including sales promotion) except for designing your machine. If you violate this provision or the laws or regulations, the Company may prohibit you from the use of the Data, the Company’s site and/or take legal action. So long as you comply with these terms and conditions, the Company grants to you a non-exclusive, non-transferable, revocable license to access and use the Data for the sole purpose of assisting you in designing machines that incorporate products.
    4. Disclaimer of Warranty
    ANY AND ALL CONTENT APPEARING ON THIS WEB SITE IS PROVIDED FOR INFORMATIONAL PURPOSES ONLY. THIS WEB SITE, ITS CONTENT AND ITS LINKS ARE PROVIDED ON AN "AS IS" AND "AS AVAILABLE" BASIS AND ARE USED ONLY AT YOUR SOLE RISK, TO THE FULLEST EXTENT PERMISSIBLE BY LAW. THE COMPANY DISCLAIMS ALL WARRANTIES, EXPRESS OR IMPLIED, OF ANY KIND, REGARDING THIS WEB SITE (INCLUDING ITS CONTENT, HARDWARE, SOFTWARE AND LINKS), INCLUDING AS TO FITNESS FOR A PARTICULAR PURPOSE, MERCHANTABILITY, TITLE, NON INFRINGEMENT, RESULTS, ACCURACY, COMPLETENESS, ACCESSIBILITY, COMPATIBILITY, SECURITY AND FREEDOM FROM COMPUTER VIRUS. THE COMPANY WILL NOT BE LIABLE FOR ANY DAMAGES OR LOSSES, INCLUDING DIRECT, INDIRECT, CONSEQUENTIAL, SPECIAL, INCIDENTAL OR PUNITIVE DAMAGES AND/OR LOST PROFITS, IN CONNECTION WITH USE OF THE INTERNET, THIS WEB SITE, ITS CONTENT OR ITS LINKS
    Further, the Company will not be liable to you for any failure or delay by the Company to provide access to the Data or any of its obligations under these terms and conditions where such failure or delay is the direct or indirect result of any circumstances beyond the Company's reasonable control (and the Company's obligations will be suspended for the duration of such circumstances).
    5. Policy of Third Parties
    You may be required to separately agree to third party's policies if you use third party software to create or browse the Data or use a third party’s CAD data. In this case, the Company does not assume any responsibility for defects of such CAD data or the software of the third party or violation of their rights. Understand them before use.

    CAD Data Download (Unit Assembly)

    CAD Data Download: File Format
    生成

    Thank you for downloading the data.

    Click the Good IDEA! button when this application example is helpful.


    This data is utilized in order to list more useful application examples in the future.

    Cautions on the CAD data

    1. Assembly data shows the assembly drawings in the concept design phase. The sole purpose of the data is to explain the structure and functionality of the assembly and is not considered nor to be used as a final design.
      You will need to edit the Data so that it meets your specific design conditions.
    2. The CAD data unit assembly consists of sub-assemblies.
      Each sub-assembly unit can be used as it is or can be edited.
    3. * The part in the frame is a sub-assembly unit.

    4. The Data for fabricated parts is based on easy-to-edit dimensions and shapes in sketches and histories.
    5. The Data including the third-part components are made by the Company.

    Back to top

  • * Unit assembly CAD data consists of some sub-assemblies.
       Each sub-assembly unit can be used as it is or can be edited.

Application Overview

Purpose

  • (Purpose)
    Workpieces on a conveyor are rotated 90 degrees and transferred to the next process.
    The gripper rotates 180 degrees, ensuring the workpiece is transferred without changing its orientation.
  • (Operation)
    Gripper down → Grip workpiece → Gripper up → 90 degree rotation and transfer → Gripper rotate 180 degrees → Gripper down → Workpiece released → Gripper up

Target workpiece

  • Shape: Connector
    size: W40 x D30 x H26
    Weight: 0.1kg

Design Specifications

Operating Conditions or Design Requirements

  • Transfer angle: 90 degrees
  • Rotation angle: 180 degrees
  • Up/down cylinder stroke: 10mm
  • Clamp stroke: 3mm One side
  • External dims.: W136 (Before rotation) x D403 x H398

Selection Criteria for Main Components

  • Timing pulley ratio is 2 : 1
  • Minimize inertia by reducing weight of the swinging parts, etc.
  • Select an air gripper force that accounts for the friction coefficient and the workpiece weight.

Design Evaluation

Verification of main components

  • The Motor selection calculations are shown below since the inertia moment applied to the stepping motor is critical.
  • Time for 90 degree motion t0: 0.5 sec.
  • Acceleration time t1: 0.1 sec.
  • Inertia moment of swinging object: JL = 4.16 x 10⁻²kg・m²
  • Operation angle: θ = 90°, Stepping motor min. step angle: θs = 0.072°
  • Operation pulse count: A=θ/θs=1250 pulses
  • Pulse rate: f2 = A / (t0 - t1) = 3125Hz
  • Motion speed: NM = θs / 360 x f2 x 60 = 37.5r/min
  • Selected motor's rotor inertia moment: J0 = 1.1 x 10⁻⁴
  • Gear ratio: i = 1 / 10
  • Acceleration torque calculation: Ta = (J0・i² + JL) / 9.55 x NM / t1 = 2.065N・m
  • Required torque calculation: TM = Ta x Safety margin = 4.13N・m (Safety margin of 2)
  • Based on Motor Torque Characteristic chart, the selected motor is OK
  • Confirmation of inertia ratio: JL / (J0 x i²) = 3.78 ≤ 10 is OK

Other Design Consideration

  • The pulley at the center of rotation is fixed.
  • For actual installation, a cover will be needed to ensure safety and dust prevention.

Explore Similar Application Examples

Page - / -

Part List

No. Part Name Sample picture MISUMI Part Number
For Price and Days to ship click on Part No.
Quantity
1 Deep Groove Ball Bearings B6006ZZ 2
2 Deep Groove Ball Bearings B6004ZZ 2
3 High Torque Timing Pulleys GPA50YU8150-A-N30 1
4 High Torque Timing Pulleys GPA25YU8150-A-N28 1
5 Timing Belts GBN720EV8YU-150 1
6 Ball Spline BSHS6-80-M3-N3 1
7 Parallel Keys KED8-20 2
8 Metal Washers WASS12-3-2 1
9 Extra Thin Resin Washers SWSPS12-6-0.5 1
10 Resin Washers FTCMS-D6-H9-V3.0-T2.0-L6.0 1
11 Air Gripper Parallel Type ACHK6-D 1
12 Fingers for Air Grippers YFTB6-P10-L20 2
13 Sensors for Air Cylinders ME34L1 2
14 Hex Posts PLSBWRK7-25 4
15 Air Cylinders MSCCN12-10 1
16 Cantilever Pin FXCC8-22-F5-G5-MA6 1
17 Idler AFBD19-30 1
18 Screw Stopper TSBE5-5 1
19 Adjusting Bolts AJSTM5-25 1
20 Blocks For Adjusting Bolts AJSBM5-21 1
21 Metal Washers WSSB35-10-3 1
22 Metal Washers AWSM-A-D38.0-V30.0-T5.5 2
23 Couplings MCOC38-18-18 1
24 Hex Posts PLSBF13-155-M5-N5 4
25 Retaining Rings RTWN42 2
26 Retaining Rings RTWN55 2
27 Metal Washers WSSB10-6-1 1
  • The part list above contains only MISUMI parts.
    The list of parts and machined products of other manufacturers than MISUMI can also be downloaded by part list download (CSV).
  • TERMS AND CONDITIONS FOR USE OF CAD DATA
    Your access to the CAD data that MISUMI Corporation (hereinafter referred to as the Company) posts on this site (including 3D CAD data, intermediate 3D CAD data and 2D CAD data; hereinafter referred to as the Data) are of products manufactured and/or sold by the Company (hereinafter referred to as the Products) assumes that you have read and accepted these terms and conditions which govern your use of the Data. If you do not agree to these terms and conditions, you must stop using this website and the Data. You must not use the Data for any unlawful purpose or in any manner inconsistent with these terms and conditions.
    1. CAD Data
    The Data is prepared for assisting the Company's users in the CAD design process by providing dimensions and other Product information. In order to provide the best speed and stability working within this site, the Product drawings were simplified to reduce the size of the Data. For instance, some of the Products are shown without the oil groove shape, screws or spring shape. Also, please be aware that the tolerance, surface roughness and/or chamfer of the Data may vary from the actual Products.
    2. Disclaimer on Data
    While the Company has carefully prepared the Data, accuracy of the Data is not guaranteed and is subject to the variances as described above. The Company may also modify, add or delete the Data at any time without prior notice. The Company assumes no liability for any direct, indirect, consequential or special damages that you may claim resulted from your use of the Data or any changes to or deletions of the Data regardless of the reason. The Company provides no warranty as to the quality, accuracy, functionality, safety or reliability of the combination of Products and parts. Example applications and combinations of the Products are provided for illustrative purposes only.
    3. Copyright
    Copyrights to the content and the Data belong to the Company or the manufacturers of the Products. The said copyright is protected by the Copyright Act and international treaties. The use (including duplication, modification, uploading, posting, transmission, distribution, licensing, sales and publishing) of the Data except for the purpose to use the Data described above without prior approval of the Company is not allowed. The Data cannot be used for any purposes (including sales promotion) except for designing your machine. If you violate this provision or the laws or regulations, the Company may prohibit you from the use of the Data, the Company’s site and/or take legal action. So long as you comply with these terms and conditions, the Company grants to you a non-exclusive, non-transferable, revocable license to access and use the Data for the sole purpose of assisting you in designing machines that incorporate products.
    4. Disclaimer of Warranty
    ANY AND ALL CONTENT APPEARING ON THIS WEB SITE IS PROVIDED FOR INFORMATIONAL PURPOSES ONLY. THIS WEB SITE, ITS CONTENT AND ITS LINKS ARE PROVIDED ON AN "AS IS" AND "AS AVAILABLE" BASIS AND ARE USED ONLY AT YOUR SOLE RISK, TO THE FULLEST EXTENT PERMISSIBLE BY LAW. THE COMPANY DISCLAIMS ALL WARRANTIES, EXPRESS OR IMPLIED, OF ANY KIND, REGARDING THIS WEB SITE (INCLUDING ITS CONTENT, HARDWARE, SOFTWARE AND LINKS), INCLUDING AS TO FITNESS FOR A PARTICULAR PURPOSE, MERCHANTABILITY, TITLE, NON INFRINGEMENT, RESULTS, ACCURACY, COMPLETENESS, ACCESSIBILITY, COMPATIBILITY, SECURITY AND FREEDOM FROM COMPUTER VIRUS. THE COMPANY WILL NOT BE LIABLE FOR ANY DAMAGES OR LOSSES, INCLUDING DIRECT, INDIRECT, CONSEQUENTIAL, SPECIAL, INCIDENTAL OR PUNITIVE DAMAGES AND/OR LOST PROFITS, IN CONNECTION WITH USE OF THE INTERNET, THIS WEB SITE, ITS CONTENT OR ITS LINKS
    Further, the Company will not be liable to you for any failure or delay by the Company to provide access to the Data or any of its obligations under these terms and conditions where such failure or delay is the direct or indirect result of any circumstances beyond the Company's reasonable control (and the Company's obligations will be suspended for the duration of such circumstances).
    5. Policy of Third Parties
    You may be required to separately agree to third party's policies if you use third party software to create or browse the Data or use a third party’s CAD data. In this case, the Company does not assume any responsibility for defects of such CAD data or the software of the third party or violation of their rights. Understand them before use.

    CAD Data Download (Unit Assembly)

    CAD Data Download: File Format
    生成

    Thank you for downloading the data.

    Click the Good IDEA! button when this application example is helpful.


    This data is utilized in order to list more useful application examples in the future.

    Cautions on the CAD data

    1. Assembly data shows the assembly drawings in the concept design phase. The sole purpose of the data is to explain the structure and functionality of the assembly and is not considered nor to be used as a final design.
      You will need to edit the Data so that it meets your specific design conditions.
    2. The CAD data unit assembly consists of sub-assemblies.
      Each sub-assembly unit can be used as it is or can be edited.
    3. * The part in the frame is a sub-assembly unit.

    4. The Data for fabricated parts is based on easy-to-edit dimensions and shapes in sketches and histories.
    5. The Data including the third-part components are made by the Company.

    Back to top

Back to top